


Today we are going to see how to use inherited widgets in Flutter.
You may have seen ‘Theme.of(context)’ in one some Flutter applications or you might have used it. The thing is ‘Theme’ is available for the whole application and in every widget correct?
We are going to do something like that and share data across the application. Here we will be sharing a user across our two screens (A HomeScreen and a FormScreen). Let’s jump in…
Demo
Below is the demo of the app we are going to build.
Watch Video Tutorials
Problem:
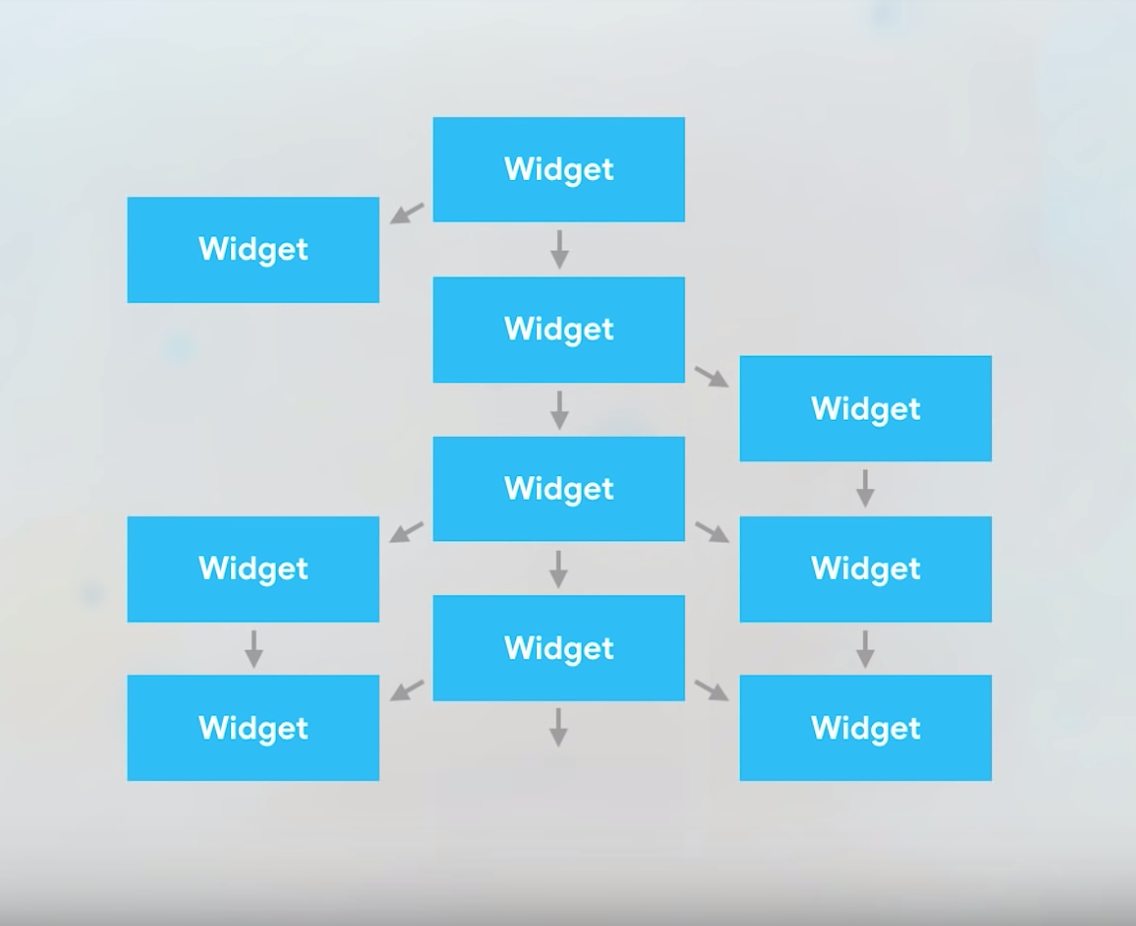
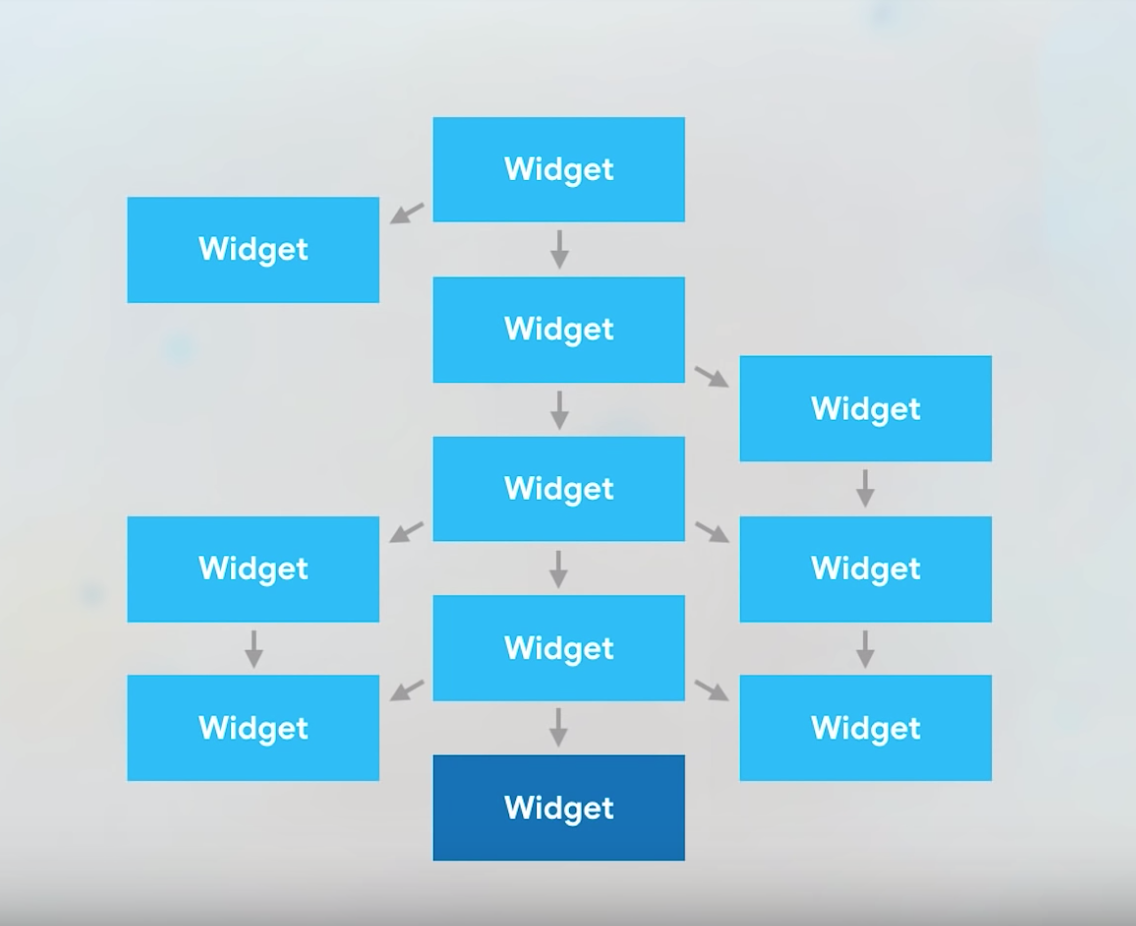
Let’s say you have a lot of widgets(Screens) in your application and you want to pass data between widgets. Of course you can pass data between screens using their constructor, but what if there are a lot of widgets, it becomes a mess correct!!. It will be more complex, isn’t it?
But you may want to pass the data from the last widget you added and update in the First Home Widget. How to do that? Inherited Widgets can come to the rescue. This is one of the ways you can do State management of your complete application.
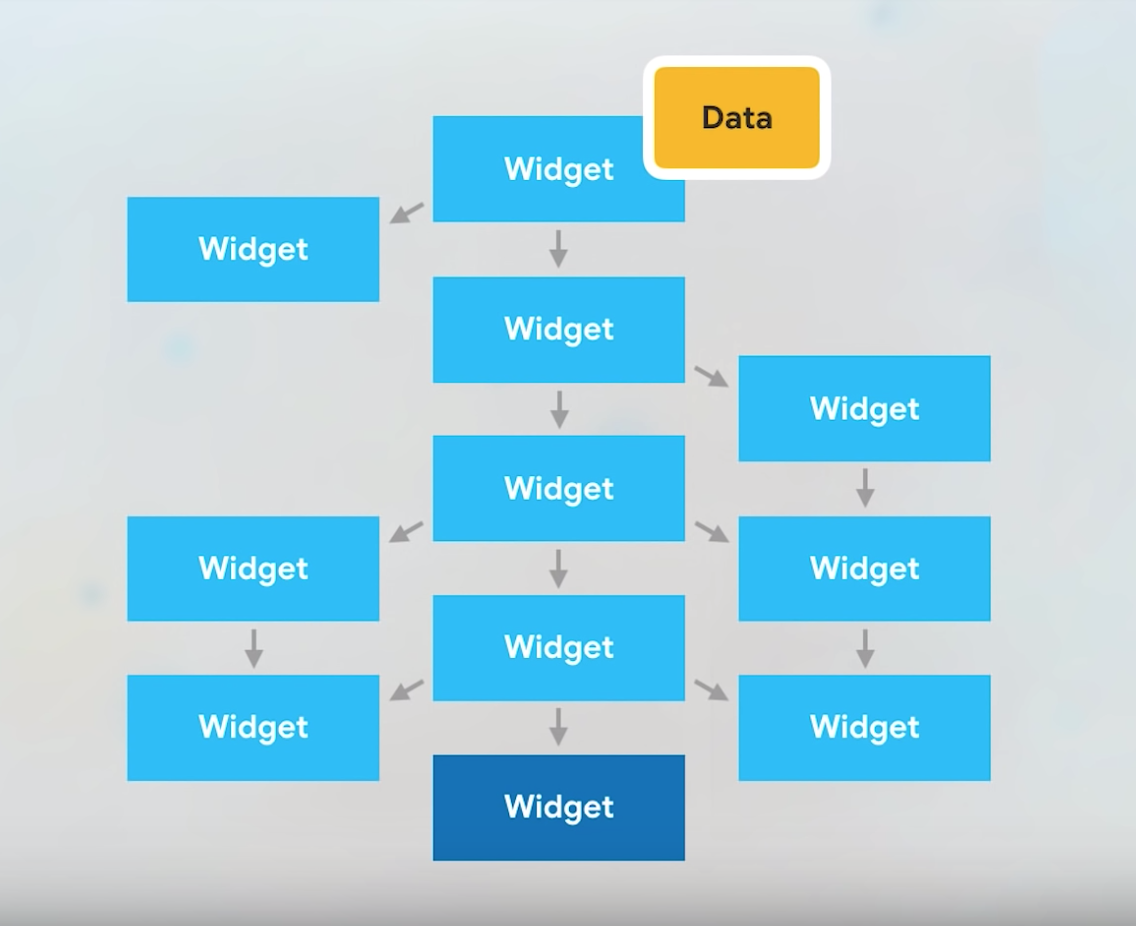
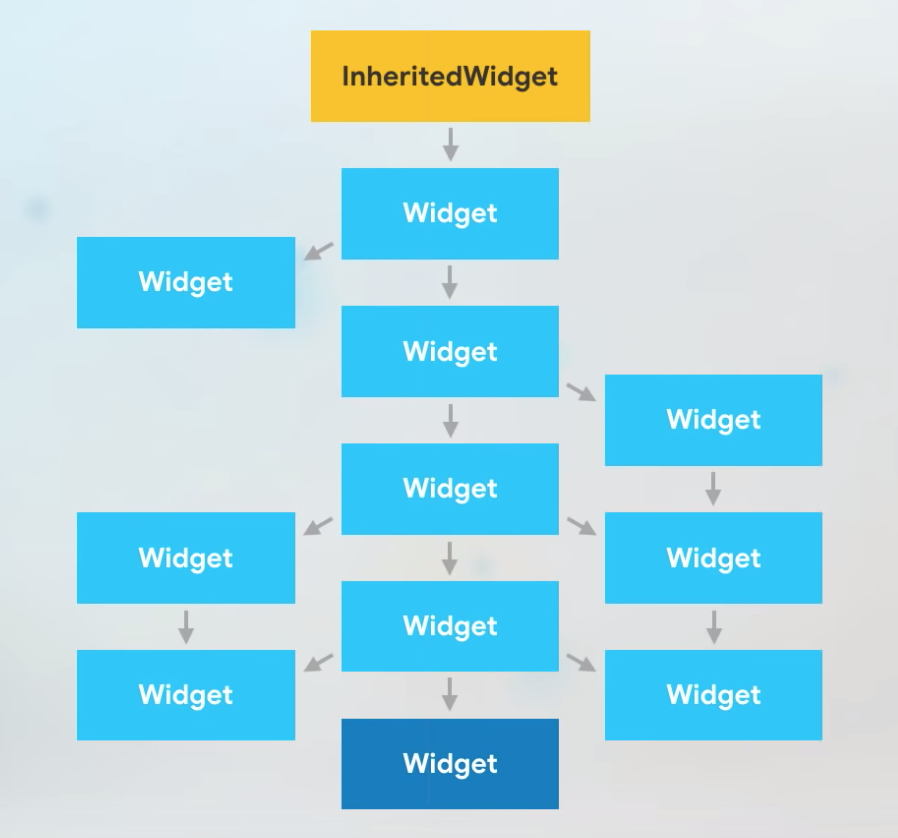
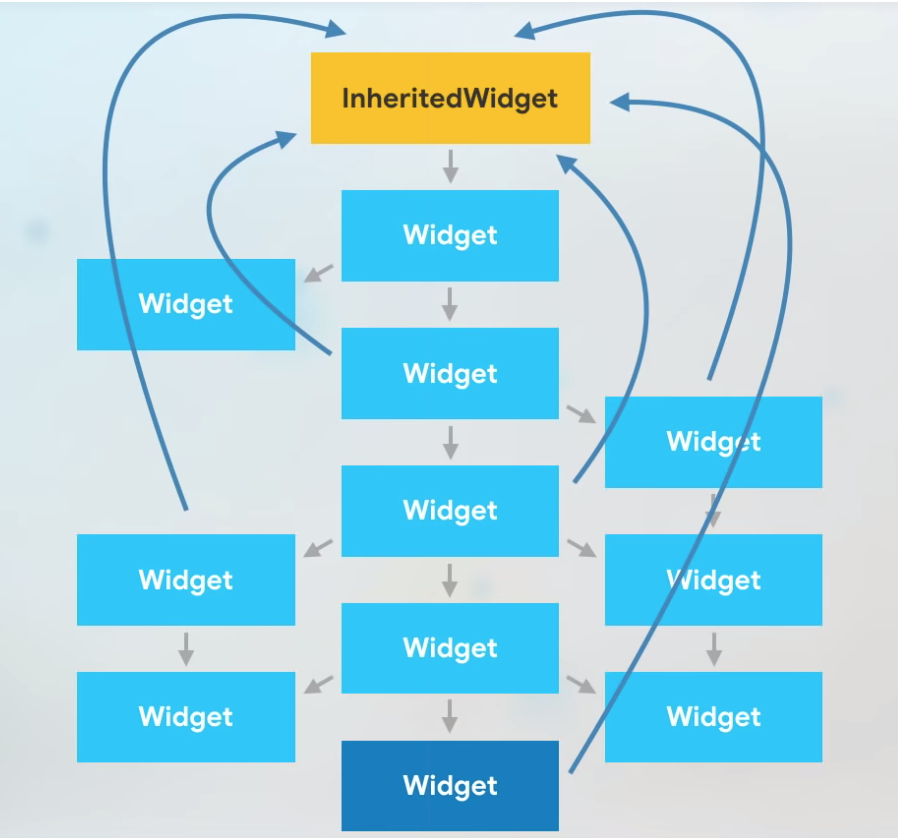
We can make the Inherited widget, the root of our application and set the data in that root widget, so that i can pass data to the widgets under it and vice-versa.
The below diagrams explains the above scenario.

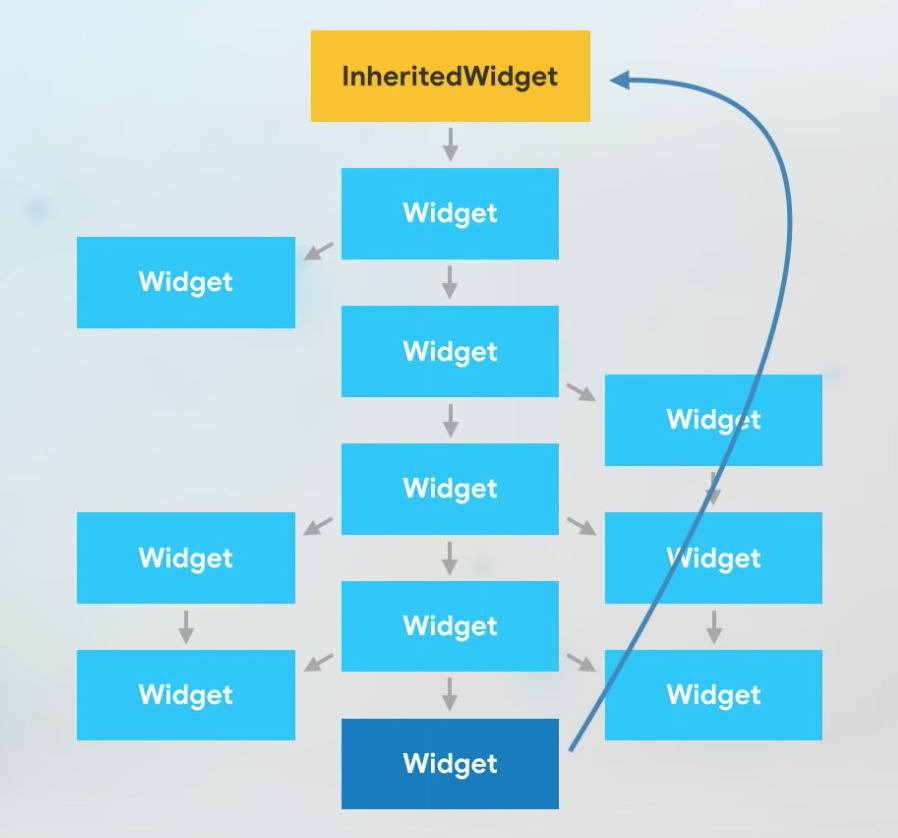
Here I am going to create two Screens, First HomeScreen and other the FormScreen and we are going to send the name typed in the form in the FormScreen to the HomeScreen.
User
We are going to have a user object in our app. To keep it simple I am just providing ‘name’ as the member.
Create a new file named “user.dart’ and contents will be…
class User {
  String name;
  User({this.name});
}
State Container – inherited Widget.
Below is the code for the inherited widget that contains the data saved by the FormScreen. Create a new file named “state_container.dart’ and copy the below code.
Let’s see the complete code first and then I will explain one by one.
import 'package:flutter/material.dart';
import 'user.dart';

class StateContainer extends StatefulWidget {
  final Widget child;
  final User user;

  StateContainer({@required this.child, this.user});

  static StateContainerState of(BuildContext context) {
    return (context.inheritFromWidgetOfExactType(InheritedStateContainer)
            as InheritedStateContainer)
        .data;
  }

  @override
  StateContainerState createState() => new StateContainerState();
}

class StateContainerState extends State<StateContainer> {
  User user;

  void updateUser({name}) {
    if (user == null) {
      user = new User(name: name);
      setState(() {
        user = user;
      });
    } else {
      setState(() {
        user.name = name ?? user.name;
      });
    }
  }

  @override
  Widget build(BuildContext context) {
    return InheritedStateContainer(
      data: this,
      child: widget.child,
    );
  }
}

class InheritedStateContainer extends InheritedWidget {
  final StateContainerState data;
  InheritedStateContainer({
    Key key,
    @required this.data,
    @required Widget child,
  }) : super(key: key, child: child);

  @override
  bool updateShouldNotify(InheritedWidget oldWidget) => true;
}
I am gonna explain how we are going to use it below.
Here we have two Widgets, one is the ‘StateContainer’ class and other one is the ‘InheritedStateContainer’ which is the actual widget that inherits the InheritedWidget.
We will be using the ‘InheritedStateContainer‘ inside the ‘StateContainer‘ Widget.
Take a look at the below function in the StateContainer.
 static StateContainerState of(BuildContext context) {
    return (context.inheritFromWidgetOfExactType(InheritedStateContainer)
            as InheritedStateContainer)
        .data;
  }
...
You can have any name for this function, but to make it look similar to the inbuilt inherited widget ‘Theme.of(context)’. We are going to make the user available to the whole application…Correct!!?
Root Widget
The main thing you have to do is to make the inherited widget, the root widget of the application. So our main.dart file will look like this.
import 'package:flutter/material.dart';
import 'inherited_widgets/demo/homescreen.dart';

void main() {
  runApp(
    new StateContainer(child: HomeApp),
  );
}

class HomeApp extends StatelessWidget {
  @override
  Widget build(BuildContext context) {
    return new MaterialApp(
      title: 'Inherited Widget Demo',
      home: new HomeScreen(),
    );
  }
}
HomeScreen (First Screen)
This is our Homescreen, one of the screens that I talked about earlier. Let’s look at the code of the HomeScreen
import 'package:flutter/material.dart';
import 'package:flutter_demo1/inherited_widgets/demo/myform.dart';
import 'package:flutter_demo1/inherited_widgets/demo/state_container.dart';
import 'user.dart';

class HomeScreen extends StatefulWidget {
  @override
  HomeScreenState createState() => new HomeScreenState();
}

class HomeScreenState extends State<HomeScreen> {
  User user;

  openForm(BuildContext context) {
    // Open Form
    Navigator.push(
      context,
      new MaterialPageRoute(
          fullscreenDialog: true,
          builder: (context) {
            return new FormScreen();
          }),
    );
  }

  @override
  Widget build(BuildContext context) {
    final container = StateContainer.of(context);
    user = container.user;

    return new Scaffold(
        appBar: new AppBar(
          title: new Text('Flutter Inherited Widget Demo'),
        ),
        body: Container(
          alignment: Alignment.center,
          child: Column(
            mainAxisAlignment: MainAxisAlignment.center,
            crossAxisAlignment: CrossAxisAlignment.center,
            children: <Widget>[
              user != null ? Text('Name:${user.name}') : Text("No Name"),
              SizedBox(
                height: 20.0,
              ),
              RaisedButton(
                child: Text("Add Name"),
                onPressed: () {
                  openForm(context);
                },
              )
            ],
          ),
        ));
  }
}
We are declaring a User object in the HomeScreen and accessing the State from the StateContainer like this.
final container = StateContainer.of(context);
    user = container.user;
...
onPress of the button in the HomeScreen, we will open the FormScreen.
FormScreen (Second Screen)
Our FormScreen just has a TextFormField that takes the values typed by the user and saves it in our Inherited Widget.
Let’ see whats the code for FormScreen look like.
import 'package:flutter/material.dart';
import 'package:flutter_demo1/inherited_widgets/demo/state_container.dart';

class FormScreen extends StatefulWidget {
  @override
  FormScreenState createState() => new FormScreenState();
}

class FormScreenState extends State<FormScreen> {
  String name;
  final formKey = new GlobalKey<FormState>();

  validateAndSave() {
    final container = StateContainer.of(context);

    if (formKey.currentState.validate()) {
      formKey.currentState.save();
      container.updateUser(name: name);
      Navigator.pop(context);
    } else {
      print("Validation Error");
    }
  }

  @override
  Widget build(BuildContext context) {
    return new Scaffold(
      appBar: new AppBar(
        title: new Text('Flutter Inherited Widget Demo'),
      ),
      body: Form(
        key: formKey,
        child: Padding(
          padding: EdgeInsets.all(20.0),
          child: Container(
            alignment: Alignment.center,
            child: Column(
              mainAxisAlignment: MainAxisAlignment.center,
              crossAxisAlignment: CrossAxisAlignment.center,
              children: <Widget>[
                TextFormField(
                  keyboardType: TextInputType.text,
                  decoration: InputDecoration(labelText: "Name"),
                  validator: (val) => val.length == 0 ? "Enter Name" : null,
                  onSaved: (val) => name = val,
                ),
                RaisedButton(
                  child: Text("Save"),
                  onPressed: validateAndSave,
                )
              ],
            ),
          ),
        ),
      ),
    );
  }
}
Here also, we will be accessing the function that we wrote in the StateContainer to save the user to the state of our Inherited Widget (the StateContainer).
Note : The important thing to note is that the state object (here user) is immutable in the StateContainer, so we will be creating if it is null and updating it when it is not null.
Check the StateContainer updateUser function.
User user;

  void updateUser({name}) {
    if (user == null) {
      user = new User(name: name);
      setState(() {
        user = user;
      });
    } else {
      setState(() {
        user.name = name ?? user.name;
      });
    }
  }
So when someones types something in the FormScreen, it is saved in our StateContainer inherited Widget State and we will access it using
StateContainer.of(context);
So now our ‘user’ is shared across the screens in our app.
Happy Coding. 🙂
Dear James, great article !
One error should be noted: the main function
void main() {
runApp(
new HomeApp(),
);
}
should be replaced with
void main() {
runApp(
new StateContainer(child: HomeApp),
);
}
HomeApp isn’t a descendant of StateContainer, which is why any calls to inheritFromWidgetOfExactType are failing
(note: in the youtube video, the main function is correctly written). Cheers, Peter
Thanks Peter for finding that. I will fix it ASAP.
Compliments, great article !
There is just a tiny typo, I’d like to mention … for all of us ‘copy-paste’ freaks:
In
void main() {
runApp(
new StateContainer(child: HomeApp),
);
}
after the class name HomeApp there are to round brackets missing: Should be written
new StateContainer(child: HomeApp ()),