


In this article I am going to show how to implement bottom tabs in Flutter.
Watch Video Tutorial
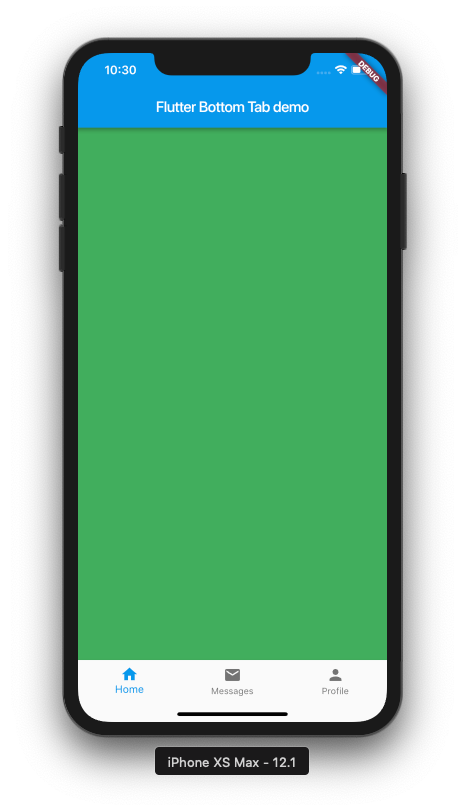
Flutter Bottom Tabs
Let’s start.
To add a bottom navigation bar in Flutter, you need to have the ‘Scaffold’ widget in the screen. So we will be adding a Scaffold widget as the parent of our screen.
Scaffold
  @override
  Widget build(BuildContext context) {
    return Scaffold(
      appBar: AppBar(
        title: Text(widget.title),
      ),
....
Now we are going to use the ‘bottomNavigationBar’ property of Scaffold.
We will add the ‘BottomNavigationBar’ which takes a list of ‘BottomNavigationBarItem’.
I am adding 3 tabs for simplicity.
Add Tabs
bottomNavigationBar: BottomNavigationBar(
        items: [
          BottomNavigationBarItem(
            icon: Icon(Icons.home),
            title: Text("Home"),
          ),
          BottomNavigationBarItem(
            icon: Icon(Icons.mail),
            title: Text("Messages"),
          ),
          BottomNavigationBarItem(
            icon: Icon(Icons.person),
            title: Text("Profile"),
          )
        ],
      ),
We will write the onTap function for the BottomNavigationBar and set the currentIndex;
 bottomNavigationBar: BottomNavigationBar(
        onTap: onTapped,
        currentIndex: currentTabIndex,
.....
Create Tab Screens
Let’s create a new file and named it “tab_screen.dart’. For simplicity, the new screen will be extending ‘StatelessWidget’ and UI will have a container and the color of the container will be coming from the main screen when the tabs are added to the bottom navigation bar.
The TabScreen will look like this.
import 'package:flutter/material.dart';

class TabScreen extends StatelessWidget {
  final Color color;
  TabScreen(this.color);

  @override
  Widget build(BuildContext context) {
    return Container(
      color: color,
    );
  }
}
Create the List of tabs and Set the CurrentIndex
class _TabsDemoScreenState extends State<TabsDemoScreen> {
  int currentTabIndex = 0;
  List<Widget> tabs = [
    TabScreen(Colors.green),
    TabScreen(Colors.orange),
    TabScreen(Colors.blue)
  ];
  onTapped(int index) {
    setState(() {
      currentTabIndex = index;
    });
  }
....
Set the tabs
 @override
  Widget build(BuildContext context) {
    return Scaffold(
      appBar: AppBar(
        title: Text(widget.title),
      ),
      body: tabs[currentTabIndex],
......
The Complete Example
import 'package:flutter/material.dart';
import 'tab_screen.dart';

class TabsDemoScreen extends StatefulWidget {
  TabsDemoScreen() : super();

  final String title = "Flutter Bottom Tab demo";

  @override
  _TabsDemoScreenState createState() => _TabsDemoScreenState();
}

class _TabsDemoScreenState extends State<TabsDemoScreen> {
  int currentTabIndex = 0;
  List<Widget> tabs = [
    TabScreen(Colors.green),
    TabScreen(Colors.orange),
    TabScreen(Colors.blue)
  ];
  onTapped(int index) {
    setState(() {
      currentTabIndex = index;
    });
  }

  @override
  Widget build(BuildContext context) {
    return Scaffold(
      appBar: AppBar(
        title: Text(widget.title),
      ),
      body: tabs[currentTabIndex],
      bottomNavigationBar: BottomNavigationBar(
        onTap: onTapped,
        currentIndex: currentTabIndex,
        items: [
          BottomNavigationBarItem(
            icon: Icon(Icons.home),
            title: Text("Home"),
          ),
          BottomNavigationBarItem(
            icon: Icon(Icons.mail),
            title: Text("Messages"),
          ),
          BottomNavigationBarItem(
            icon: Icon(Icons.person),
            title: Text("Profile"),
          )
        ],
      ),
    );
  }
}
And That’s it. Please leave your valuable comments below.
Thank you.