Hello all…..
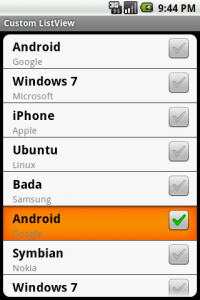
In today’s tutorial I will show you how to create a custom listview in android.
For that we need 3java files.
One holding the ListView itself another a Model object that holds the data for the listview and the third one for the Adapter which extends the ArrayAdapter class for holding the model.
First the Model.java file
package pack.coderzheaven;

public class Model {

	private String name;
	private String place;
	private boolean selected;

	public Model(String name, String place) {
		this.name = name;
		this.place = place;
		selected = false;
	}

	public String getName() {
		return name;
	}

	public String getPlace() {
		return place;
	}

	public void setName(String name) {
		this.name = name;
	}

	public void setPlace(String place) {
		this.place = place;
	}

	public boolean isSelected() {
		return selected;
	}

	public void setSelected(boolean selected) {
		this.selected = selected;
	}

}
Now the second file MyCustomArrayAdapter.java that extends the Arrayadapter class.
package pack.coderzheaven;

import java.util.List;

import android.app.Activity;
import android.graphics.Color;
import android.view.LayoutInflater;
import android.view.View;
import android.view.ViewGroup;
import android.widget.ArrayAdapter;
import android.widget.CheckBox;
import android.widget.CompoundButton;
import android.widget.TextView;

public class MyCustomArrayAdapter extends ArrayAdapter<Model> {

	private final List<Model> list;
	private final Activity context;

	public MyCustomArrayAdapter(Activity context, List<Model> list) {
		super(context, R.layout.list_layout, list);
		this.context = context;
		this.list = list;
	}

	static class ViewHolder {
		protected TextView text, sub;
		protected CheckBox checkbox;
	}

	@Override
	public View getView(int position, View convertView, ViewGroup parent) {
		View view = null;
		if (convertView == null) {
			LayoutInflater inflator = context.getLayoutInflater();
			view = inflator.inflate(R.layout.list_layout, null);
			final ViewHolder viewHolder = new ViewHolder();
			viewHolder.text = (TextView) view.findViewById(R.id.label);
			viewHolder.text.setTextColor(Color.BLACK);
			viewHolder.sub = (TextView) view.findViewById(R.id.sub);
			viewHolder.sub.setTextColor(Color.GRAY);
			viewHolder.checkbox = (CheckBox) view.findViewById(R.id.check);
			viewHolder.checkbox
					.setOnCheckedChangeListener(new CompoundButton.OnCheckedChangeListener() {
						@Override
						public void onCheckedChanged(CompoundButton buttonView,
								boolean isChecked) {
							Model element = (Model) viewHolder.checkbox.getTag();
							element.setSelected(buttonView.isChecked());
							System.out.println("Checked : " + element.getName());
						}
					});
			view.setTag(viewHolder);
			viewHolder.checkbox.setTag(list.get(position));
		} else {
			view = convertView;
			((ViewHolder) view.getTag()).checkbox.setTag(list.get(position));
		}
		ViewHolder holder = (ViewHolder) view.getTag();
		holder.text.setText(list.get(position).getName());
		holder.sub.setText(list.get(position).getPlace());
		holder.checkbox.setChecked(list.get(position).isSelected());
		return view;
	}
}
Now the main Java file which is named ModelListViewActivity.java
package pack.coderzheaven;

import java.util.ArrayList;
import java.util.List;

import android.app.ListActivity;
import android.os.Bundle;
import android.widget.ArrayAdapter;

public class ModelListViewActivity extends ListActivity {

	public void onCreate(Bundle icicle) {
		super.onCreate(icicle);
		setContentView(R.layout.main);

		ArrayAdapter<Model> adapter = new MyCustomArrayAdapter(this,	getModel());
		setListAdapter(adapter);
	}

	private List<Model> getModel() {
		List<Model> list = new ArrayList<Model>();
		list.add(get("Android","Google"));
		list.add(get("Windows 7","Microsoft"));
		list.add(get("iPhone","Apple"));
		list.add(get("Ubuntu","Linux"));
		list.add(get("Bada","Samsung"));
		list.add(get("Android","Google"));
		list.add(get("Symbian","Nokia"));
		list.add(get("Windows 7","Microsoft"));
		list.get(1).setSelected(true);	// select one item by default
		return list;
	}

	private Model get(String s,String place) {
		return new Model(s,place);
	}
}
Now the layout for each row in the ListView. – list_layout.xml
<?xml version="1.0" encoding="utf-8"?>
<RelativeLayout xmlns:android="http://schemas.android.com/apk/res/android"
	android:layout_width="fill_parent" android:layout_height="wrap_content">
	<TextView android:text="@+id/label" android:layout_width="wrap_content"
		android:layout_height="wrap_content" android:id="@+id/label"
		android:layout_marginLeft="15dp"
		android:layout_marginTop="5dp"
		android:textStyle="bold"
		android:textSize="20px"></TextView>
	<TextView android:text="@+id/sub"
		android:layout_below="@+id/label"
			android:layout_width="wrap_content"
		android:layout_height="wrap_content" android:id="@+id/sub"
		android:layout_marginLeft="15dp"
		android:textSize="15px"></TextView>
	<CheckBox android:id="@+id/check" android:layout_width="wrap_content"
		android:layout_height="wrap_content" android:layout_marginLeft="4px"
		android:layout_marginRight="10px" android:layout_alignParentRight="true"
		></CheckBox>
</RelativeLayout>
Now the main.xml file that holds the ListView.
<?xml version="1.0" encoding="utf-8"?>
<LinearLayout xmlns:android="http://schemas.android.com/apk/res/android"
    android:orientation="vertical"
    android:layout_width="fill_parent"
    android:layout_height="fill_parent"
    >
	 <ListView
			android:id="@id/android:list"
			android:layout_width="fill_parent"
			android:layout_height="wrap_content"
			android:background="@drawable/customshape"
			android:dividerHeight="1px"
			android:cacheColorHint="#0000"
			android:clipToPadding="true"
			android:layout_margin="5dp"
			android:soundEffectsEnabled="true"
			android:scrollbars="none">
	</ListView>
</LinearLayout>
customshape.xml (in the drawable folder)
<?xml version="1.0" encoding="utf-8"?>
<selector xmlns:android="http://schemas.android.com/apk/res/android">
    <item>
        <shape>
             <gradient
                android:endColor ="#000000"
                android:startColor="#FFFF0000"
                android:angle="270" />
            <stroke
                android:width="0dp"
                android:color="#C2C2C2" />
            <corners
                android:radius="5dp" />
        </shape>
    </item>
</selector>
Now the AndroidManifest.xml file.
<?xml version="1.0" encoding="utf-8"?>
<manifest xmlns:android="http://schemas.android.com/apk/res/android"
      package="pack.coderzheaven"
      android:versionCode="1"
      android:versionName="1.0">
    <uses-sdk android:minSdkVersion="6" />

    <application android:icon="@drawable/icon" android:label="@string/app_name">
        <activity android:name=".ModelListViewActivity"
                  android:label="@string/app_name">
            <intent-filter>
                <action android:name="android.intent.action.MAIN" />
                <category android:name="android.intent.category.LAUNCHER" />
            </intent-filter>
        </activity>

    </application>
</manifest>

Thanks for this great tutorial.
Pingback: ListView with Sections in android. | Coderz Heaven
Hi,
Thanks for nice example.
Please provide download link for sample example as it is very difficult for fresher to understand and implement.
Thanks.
Please upload resources also like images, audio…etc used in the above example, I am unable to find customshape from drawble
Thanks
I am not getting rounded corner in ListView on top and bottom, how can I display rounded corner as shown in above image.