


Hello everyone…
Today I will show you how to create a simple widget in android?
First create a new project and name it “Widget1” and name the activity “WidgetDemo1“.
Actually we dont need the activity class here. You can delete it and delete the corresponding entry of it from the AndroidManifest file also.
Now we will make the layout for the widget.
We will make the layout to be the main.xml.
So modify the contents of main.xml.
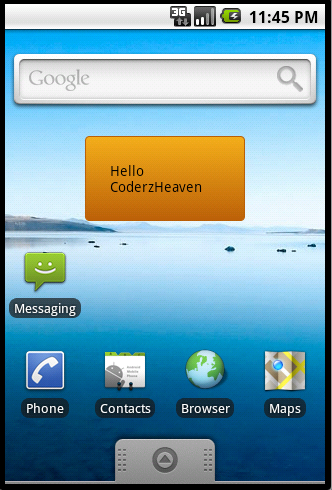
<?xml version="1.0" encoding="utf-8"?>
<LinearLayout xmlns:android="http://schemas.android.com/apk/res/android"
	android:layout_width="fill_parent"
	android:orientation="vertical"
	android:background="@drawable/yellow_bkg"
	android:layout_gravity="center"
	android:layout_height="wrap_content">
<TextView android:id="@+id/widget_textview"
	android:text="Hello CoderzHeaven"
	android:layout_height="wrap_content"
	android:layout_width="wrap_content"
	android:layout_gravity="center"
	android:layout_margin="5dip"
	android:padding="10dip"
	android:textColor="@android:color/black"/>
</LinearLayout>
Now you may have some errors like resource not found etc.
So now create an xml inside res/drawable folder and name it “yellow_bkg.xml” and copy this code into it.
This will be the background for our widget. However you can have your own background.
<?xml version="1.0" encoding="utf-8"?>
<selector xmlns:android="http://schemas.android.com/apk/res/android">
    <item android:state_pressed="true" >
        <shape>
            <solid
                android:color="#f3ae1b" />
            <stroke
                android:width="1dp"
                android:color="#bb6008" />
            <corners
                android:radius="3dp" />
            <padding
                android:left="10dp"
                android:top="10dp"
                android:right="10dp"
                android:bottom="10dp" />
        </shape>
    </item>
    <item>
        <shape>
            <gradient
                android:startColor="#f3ae1b"
                android:endColor="#bb6008"
                android:angle="270" />
            <stroke
                android:width="1dp"
                android:color="#bb6008" />
            <corners
                android:radius="4dp" />
            <padding
                android:left="10dp"
                android:top="10dp"
                android:right="10dp"
                android:bottom="10dp" />
        </shape>
    </item>
</selector>
Now modify the AndroidManifest.xml.
<?xml version="1.0" encoding="utf-8"?>
<manifest xmlns:android="http://schemas.android.com/apk/res/android"
      package="com.coderzheaven.pack"
      android:versionCode="1"
      android:versionName="1.0">
    <application android:icon="@drawable/icon" android:label="@string/app_name">
        <!-- This part is for the Widget -->
        <receiver android:name=".MyWidget" android:label="@string/app_name">
			<intent-filter>
			<action android:name="android.appwidget.action.APPWIDGET_UPDATE" />
			</intent-filter>
			<meta-data android:name="android.appwidget.provider"
			android:resource="@xml/simple_widget" />
		</receiver>
    </application>
</manifest>
The meta-tag tells android about your widget provider. In this case, the widget provider is located at
res/xml/simple_widget.xml. The provider.xml is pretty much self explaining:
<?xml version="1.0" encoding="utf-8"?>
<appwidget-provider
	xmlns:android="http://schemas.android.com/apk/res/android"
	android:minWidth="150dip"
	android:minHeight="70dip"
	android:updatePeriodMillis="10000"
	android:initialLayout="@layout/main"
/>
updatePerdiodMillis is the time in milliseconds to update your widget. In our
case, this is unimportant and we don’t need it because we don’t do any update on our widget.
Now create a new class and name it “MyWidget” and set AppWidgetProvider as super class.
Look at the screenshot.
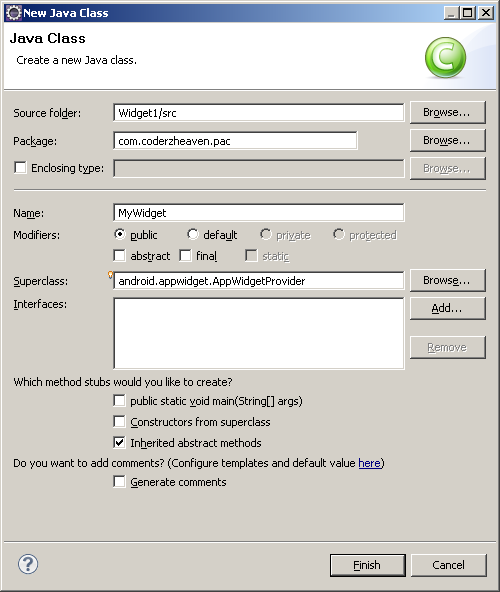
MyWidget.java will look like this.
package com.coderzheaven.pack;

import android.appwidget.AppWidgetProvider;

public class MyWidget extends AppWidgetProvider {

}
These are the contents of strings.xml
<?xml version="1.0" encoding="utf-8"?>
<resources>
    <string name="hello">Hello World, WidgetDemo!</string>
    <string name="app_name">Simple Widget</string>
</resources>
Now we have created the widget and you can now run the application.
Please comment if this post was useful.
please share it so that it can be useful to others.
Pingback: How to get Notified when a widget is deleted?
Pingback: Handling Multiple Instances of a Widget in Android and Identifying each instance with it's own ID.